Equipment Suggestions to help you Learn the Japanese Language
If you want to learn the Japanese language, after you download our free Japanese audio lessons, you should think about getting the right equipment. You will need to be able to pause the lessons whenever you need time to think, and to restart them when you are ready to start listening again. Apple and other manufacturers make earphone units with built-in wired controls (“clickers”), but they are not very convenient when you are using audio lessons that need to be paused and restarted frequently, since the buttons that control the portable device are located high on the cord near a person’s neck.
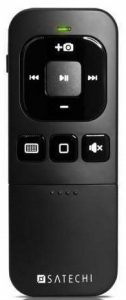
If you want to use an iPhone to listen to these audio lessons as you learn the Japanese language, I suggest the Satechi BT MediaRemote, the older version of which is shown in this photo:

This device did a good job controlling my devices: an iPhone 4S, an iPhone 6, and an iPod; however, I have not tested the newer version. The Bluetooth connection had the advantage of not requiring a line-of-sight to the mp3 player, so that the player could stay concealed in my pocket. This clicker seemed to use very little energy, and the batteries lasted for months with daily use. Unfortunately, it required modification with strips of metal and duct tape, to prevent me from accidentally jumping to another track when I tried to pause or restart a lesson.
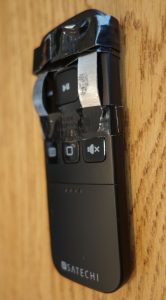
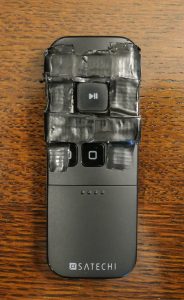
It was fairly simple to use tin snips to cut small strips of metal from a thin piece of aluminum sheet metal, place them over the four offending buttons (Volume Up, Volume Down, Skip Back and Skip Forward), and cover them with duct tape, as shown in the next two photos. (Although you wouldn’t expect it, all four of these buttons can cause the device to skip tracks in the lessons.)
The next photo shows two silver strips of metal covering the Skip Back and the Skip Forward buttons, which I have attached to the clicker with black duct tape. In addition, a strip of metal is covering the Volume Up button at the top of the clicker, but this strip is covered with tape and isn’t easy to see in the photo. Notice that the metal strips have been curved to prevent accidental contact with the buttons below them.

The next photo shows a final strip of metal covering the Volume Down button. All of the strips are now covered with duct tape, and only the Pause/Start button is visible in the middle of the four covered buttons.

When applying the duct tape, I had to be careful not to cover the small light at the top of the front panel and also not to cover the on-off switch at the top left of the clicker. After applying the metal strips, I am no longer able to control the volume using the remote control (I have to do that using buttons on my devices), but I no longer need to worry about accidentally skipping from one lesson to another.